Tuesday, May 28, 2013

Coming up: the Annual lampwork event of the Danish Bead Society, June 1-2, 2013

It's that time of year again. 
On friday I'll be off for the annual get together of the Danish Bead Society, taking place as always, at the grounds of Ravstedhus in Southern Jutland.
Two days of lampwork fun (June 1-2), demoes, glass and tool shopping, and of course - the bead contest.

This year will be extra specially exciting for me, as I will be doing my very first demo on saturday! I will be showing a basic flower implosion in soft glass. Very usefull for both marble making and bead making too. 


Saturday is for the members only, full of fancy demos. If you are not a member, but want in on the fun, I bet you could become one right then and there by simply showing up and paying the yearly fee (200,- Dkr).

But on to the bead contest. The theme this year is 'Contrasts' and since the deadline for sending in has passed, here is a picture of my bead.


My bead for this years bead contest, themed 'Contrasts'.
It is a sculpted bead, with a man on one side and a woman on the other. One is White, one is Black. One is rounded one is angular. One is curvy, one is fit.
It was my first and only idea, so I just had to make it :)
ETA: here it is from four sides


Since I have never sculpted a man before, I made a couple of beads before I were happy (and out of time) and sent off no.4.


I wasn't paying attention when I snapped this pic, so it's 1, 3, 2 and 4

and here they are from the side
 
It was not an easy bead to make. What troubled me the most (besides the sculpting of the man) was laying on the 2 colours seperately on either side of the mandrel, until I remembered (at bead no.4). I could simply make a transparent base, then 'paint' the two sides with the colours. So much easier! so there is your Tip of the Day.
 
Also, it is surprisingly difficult to make a body without a back. You would think it would be half the work, but no. All kinds of challenges arise from not being able to shape freely around the sides of the bead. It all comes down to practice though, and this is a bead I will continue to explore. It's a challenge :)
 
So - the event is open for the public on sunday the 2'nd, so come on over and try making your own bead, see some demoes, vote for your favourite at the bead contest and find many lovely treasures to bring home at the lampwork market.
Furthermore, the shop at Ravstedhus will be open, and several sellers from Germany will be there too, with all you need for lampworking and jewelry making.


Monday, May 06, 2013

Foldforming - I love it!

My first attempts with a more suitable hammer :)

You wouldn't believe it, but this is the start of a beautiful organically shaped leaf. The shape to the right is folded on the straight side, and then cut out of a 0,5mm copper plate.

The cresent to the left had the same shape before I took my hammer to it and gave it a good whacking. From the center and out to both ends, taking care not to hit the folded edge too much, just the open side of it.

Height of straight fold - 4,5cm

After hammering on both sides (to get the texture on both sides) I took it to my kitchen and heatet it on my gass stove to a dull red glow, then into the sink in a bath of cold water to cool it quickly.
Then the magic of unfolding begins ...

Oh yes ...!

Yummy

Smaller version, 3cm. I consider giving it a twist
 
And am I ever pleased. I love organic shapes, I love leaves, I even love the colour of copper!
 
These are straight from the flame (or the sink actually), and while I love the burnt autumn colours I would like to try a polished version some time. And a silver version ... Oh yum!
 
~ o 0 o ~
 
Oh, a slight problem - my lovely little anvil is now full of marks from the half of the hammer not hitting the copper (cause it's a tiny little bit of metal to work on). I rather thought anvils were too hard to get marks from hammers so I'm a little down by that.
 
Does this mean I should get a slimmer hammer? One that does not protrude beyond the edge of the copper. Is that what you all use out there in foldforming-land, tiny little hammers that are 1cm or less wide?

Monday, April 22, 2013

Inspiration has hit ...

You know that feeling you get, when you discover something new and wonderful, and you just want to jump in and try it out, right this second? Well, I've got that feeling big time.

Before I found lampworking, I dappled a bit in metal jewelry. Just a bit mind you, and it's been ... what, 20 years or so?
It was a bit of sawing, filing and soldering, and then some swirlings of really fat wires. But it never came to much. Then one of the very last things I did before packing it all up was this copper neckpiece.


I made a pattern, cut it out and hammered it up from a flat sheet on my little anvil. I'm still kind of proud of it, all these years later, even though it is not really comfy since you can't move/turn your head freely wearing this. But the shape is nice and it has a lovely texture, and it came out quite well I think, for not knowing what I were doing.

And now I've discovered techniques that makes my heart race. Oh yes!
Anticlastic raising, Rueger folds, star folds, sinusoidal stakes ... my mind is buzzing with wonderful new words and ideas of gloriously organic shapes. Goggle 'fold forming', click for pictures and behold a world of beauty. Please do google it, you really have to see what I am going on about. Or just click here :)

I have to try this, I really do, or I'll simply burst. I have dug out my old tools from the box in the basement. I have my little anvil, I have some copper plate, I have my saw and a bunch of blades. I am sure I can anneal the copper with my lampworking torch, if I take care not to melt it ... but I am terribly short on usefull hammers, and I have no stakes either, and both are kind of vital.

ETA: Okay, so I tried to make a leaf, the simplest fold forming possible (I think), and ... I'm not going to show it. It is horrible :) I found out I really do need a hammer with the propper shape (mine is slightly rounded, but mostly flat and circular. And it's way too light for this), but hey! I found out I can anneal the copper right on the top of my kitchen stove!
Brilliant :)
And I can draw and think up what I want to do, until I can get some tools. Yay!

Monday, April 08, 2013

How to change the relay of your kiln: Uterm BA-2

My kiln has been having trouble keeping a steady temperature lately, so I emailed the nice people at Uterm and they sent me a replacement relay (Thank you, Uterm!)

I were wondering if I would be able to replace it myself, since I have no idea what goes on inside a kiln, but as you see, it was a piece of cake :)

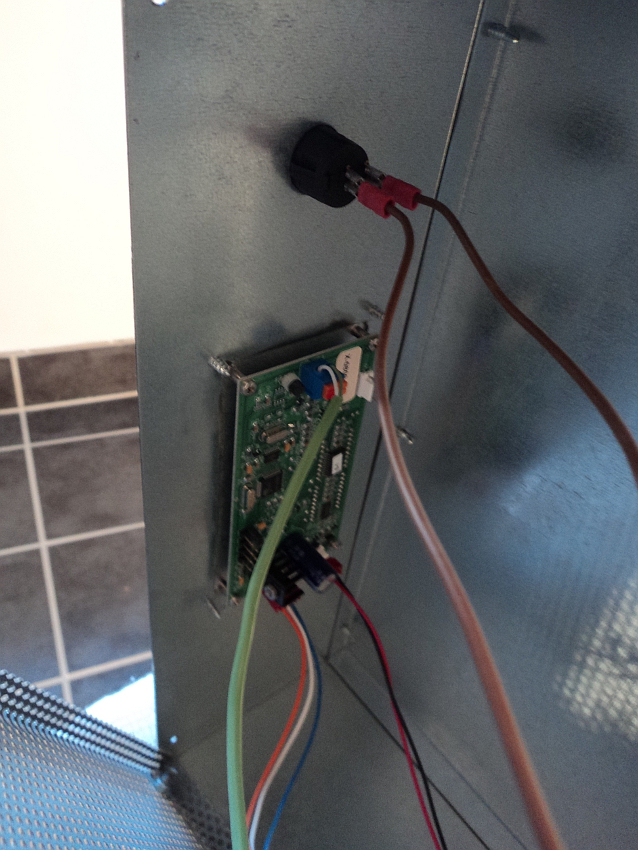
Here is my kiln seen from below. You may be able to see 2 boxes attached to the bottom plate from the inside, and a bunch of wires.

4 screws keep the bottom plate in place from the outside. 2 in front and 2 in the back. A little tight, but easily removed. I pulled out the bottom plate with an old screwdriver, by pulling on the little 'legs'.


Here it is opened, revealing the wires inside. I were surprised there wasn't more parts in there.


The wires go in (and back out and up to the heating elements) ...


There is the relay, and a transformer behind it ...


And over here on the other side is the brain, with the control buttons on the outside. And that is it ...


The relay has 6 wires attached, two of them double, and with this much space to work in they were easily removed and attached to the new relay in their propper places. Then I unscrewed the old relay and put the new one in it's place.


I closed up the bottom plate and put the 4 screws back in.
Voilá, all done.
Much easier than I had imagined :)

Tuesday, March 12, 2013

Studio Renovation

So - do you remember, a year and a bit ago, I started rambling about how I were going to clear out all the stuff in the basement and have the room renovated and have a really nice studio?

Well, we're halfway there, and that deserves a fanfare: Toot tooteloot!!

And here are the pictures to prove it :)

The 'before', Yikes!


January 2013:
Only the flooring has been laid in at this point, but at least the room is empty. The table in the center of the room had nowhere to go, so we covered it up in paper and used it as a worktable.


The outer wall was in a pretty bad shape and had to be brutalized with a crowbar. You may be able to see that it was quite a layer that came off. And quite an area also.


Then my sweet and handy boyfriend set to work. He plastered up the wall, scraped off all the yellow paint, covered the walls and ceiling first in a sealing liquid, then fiber 'wallpaper' and finally painted everything white. See?


Except around the heater, that will be hidden by a curtain later.

 
So now I have the opportunity to build a great studio for all of my creative urges :)
 
I have many ideas of what I want to fit in there, but tell me - What do you enjoy most in your studio? What clever little details have you come up with? What have you done/build/bought, that you can't imagine functioning without?
 
I'd love to know.
Thank you,
Lene


Monday, March 04, 2013

Opening Day at Mille-Maj's

Opening day(s) went well, I heard from an excited, but very tired MilleMaj at closing time on saturday. She even had a painting class later in the day (I told you she is efficient), after all the visitors had gone home.

Picture time!

Here is the entire shop from outside, and the two windows seperately below for better viewing of the art (click them).


Inside, lots of goddies! Here a table full of ceramics, teapot warmers and other bits, and lots of colourful paintings and fused and slumped glass bowls by the wall.


A fine little cupboard, stuffed with pillows and owls. All the furniture is for sale too :)


The ceramic corner, cups, bowls and creatures, Oh my!


And here is the display for my pendants and figures in a glass cabinet in the center of the shop. Nice :)


And on the shelf above them, these fun characters. Is it a toucan or a punk-haired hunchback? Fun!


And look at this charming fellow :)


These were my favourite ceramic pieces. Mermaid bowls with beautifully decorated tails, and tiny little bowls with the most amazing red interior colour.


While I were having a look around, the girls were busy having fun with silk- and foamclay, and many little creatures were born.


There were so many more bits and pieces, but I'll stop here for now.
If you are into handmade, this is definately worth a visit :)
at Jernbanegade in Frederikssund

Tuesday, February 26, 2013

I'm in a new shop! Mille Maj in Frederikssund

This is very exciting!

This is a completely new shop, opening for the first time on friday march 1'st 2013.
Yes, there's only a few days untill the grand opening festivities, which by the way, will last for a full 2 days! Both friday and saturday will be stock full of great offers at reduced prices, and fun activities to join in on.

Mille Maj is one adventurous and highly efficient lady, and the shop is a wonderful mix of creativity. Yours and mine. She has pieces from several talented artists, in glass, ceramics, metal, fabric and paint, and also materials for you to buy and make your own crafts. And not only that, she is also offering a whole range of classes you can sign up for.

You can read all about it (in Danish) at Mille Maj's website.


Mille Maj's shop, before opening day,
with only a little bit of the craftyness showing :)
Thank you Mille-Maj for the use of your photo
This weekend I went and delivered my part of the goods. I gave her 4 godess figures and a whole bunch of goddess- and drop pendants, plus many pairs of loose flowerbeads for crafting jewelry. Many of these will be presented at a reduced rate for the opening.

I work on fridays, but I look much forward to going on saturday to have a look at all the wonderful creations. Uuf! I'm so excited!

The opening hours on the 2 opening days are as follows:

Friday 10-17.30
Saturday 10-14

You can see the regular hours at Mille Maj's website.

Come see all the crafty goodness for yourself :)
Woot!
Related Posts Plugin for WordPress, Blogger...