Monday, December 03, 2012

Tolkien Event at Galleri Castens!

The premiere of the new Hobbit movie is just around the corner, and jeweler extraordinaire Karin Castens of Galleri Castens in Copenhagen is making an event of it.

She has made a series of jewelry with an elven theme. It fits her style perfectly, and this saturday, on dec. 8'th at 2pm you are invited to come to her beautiful shop and enjoy a free Tolkien themed harp concert and the unveiling of her new pieces.

She has only revealed one of her designs, a gorgeous pair of earrings. They are so very pretty and I want them! I'll pet them and squeeze them and name them 'my precious'.
You can see them here, on her facebook page, where you might also be very lucky and win a pair! Yes, Galleri Castens has been touched by the spirit of Christmas and is giving away treasures right and left (or at least a fabulous piece every sunday until Christmas). Go and like her page NOW to have a chance at winning.
 
Karin also asked all of us, who have pieces in her gallery, if we would like to participate in creating Tolkien inspired jewelry for the event. Why yes, yes I would :)

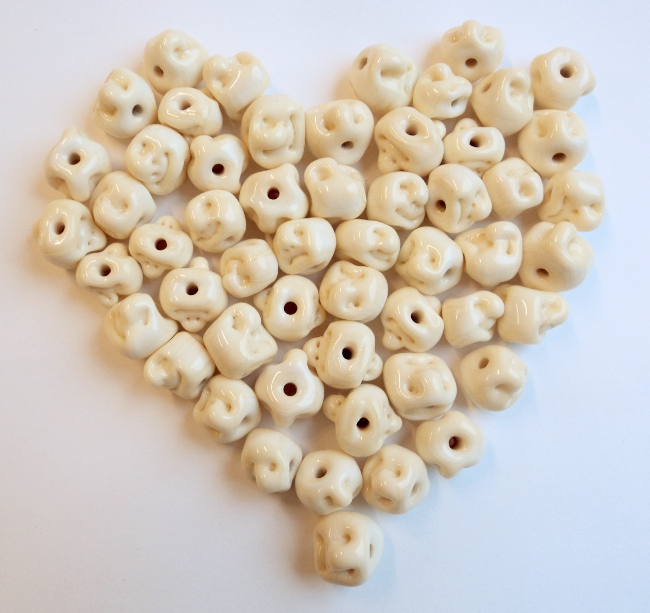
My first idea got dumped pretty quickly, and my second thought was to make orc teeth and maybe some bones. But when I showed my children the tooth I had made, and asked them what it was (is it a pelican? is it a tadpole? well, at least one child suggested it was a claw) it was pretty obvious I'd need more time to practice to be able to pull that off.

In the end I was very pleased to send in this leaf and flower necklace on handpainted silk ribbon.


Making this have me tempted to do an all flowers necklace, with different colours and sizes all around the neck. That would be lovely for spring :)

Now I am looking very much forward to saturday, where I will go and have a listen and a look at all the beauties that has been made. Want to join me? :)

Monday, November 05, 2012

Happy/Sad Facebeads, a blast from the past

Recently I got a surprise order of a whole bunch of happy-sad facebeads. This is a bead I made back in 2008 when I were just starting out, and it was really nice to make them again.

These are just like the ones from back then, but now I have several new ideas flapping around in my mind because of this visit to the past. Yay, this will be fun!

I rarely have this many beads at once, so I snapped a few pictures before sending them off to their new home tomorrow.

Cute, eh? :)


Monday, October 29, 2012

Universe / Planet Marbles


One of the very first things I bought when I started lampworking almost 6 years ago, was fine silver leaf. 25 little sheets of it, and guess what I still have laying around.

Well, this week I made good use of some of them and made these universe marbles.

Click for a larger version.
These marbles are so lovely in the sun.

The three smaller ones are thinly encased, and I'd like to try one with a thicker layer of clear next time. It is fun to see the center 'landscape' bend under the clear, and a thicker layer would magnify even more. I might be able to make mountains or craters or perhaps even clouds. Some sort of structure in any case.

The two bigger ones have a spiralling indentation under the surface. They are not too tight, but I think people call them tornado beads, when using this technique for beads.

Those two marbles are my biggest ones yet, but I gave the very biggest to a new friend, and forgot to measure it first, so I can't say exactly how big it was. I any case, the spiralling technique adds quite a bit of clear and makes the marble grow considerably from its base size.

As for the roundness - I'm getting closer every time :)

Monday, October 15, 2012

What is a MARIMO?

No, not a fancy new lampworking tool, or a fabulous new colour of glass - a Marimo is a bunch of algae, living and growing as a free flowing ball, rolling along on the bottom of Lake Akan in Japan. They have no roots and sometimes they will lay on the bottom, sometimes they will rise up to the surface, presumably to get more light.

See videos on YouTube about marimos

They are good for clearing the water in your aquarium, where they will use up all the nutrients before other types of algae gets a chance to grow. If you do not have an aquarium that needs tending, you can keep the Marimo as a pet (or more likely, as a houseplant, though submerged in water).

A few weeks ago I first encountered these intriguing lifeforms, and I'm afraid I fell in love right away. It is probably just a fad, but ... my Marimos are here! Woot!! :)

I ordered a bunch of them. I have some for my aquarium, some for my desk at work, some for the windowsills, some for my children to love, and even some for my mother. Yes, the madness is spreading :)

And hey, being a lampworker, what else could I do? I made Marimo beads!


Just a couple so far, testing out colours. I used my new cane-making abillity to pull stringers with an opaque center and a transparent coating. It is very suiting for these beads, emulating algae strings overlapping the ball surface.

The first cane was made with a peagreen center, and ended up in this bead.


Then I accidentally grabbed a rod of Kiwi, same peagreen surface, but with a transparent center. When pulled to a stringer and applied it has a more ghostly see-through appearence. I like that too on these darker versions.


I tried a few different colours for base colour, which all seemed possible from what I have seen on YouTube, and now that I have the real deal to look at I will see what I can do to make them a bit more velvety. I'm happy about the texture though.

The Marimo balls also exists in other places, like Iceland and Estonia, and even in Denmark we have a similar ball of algae. In Danish it is called 'gedebolle' (goat-ball), named after the green ball a ruminant will retch up for a second or third munching.
Not quite as charming as Marimo or Mooskugeln as they are called in Germany. So mine will be Marimos, unless of course they each get a pet name ... We'll see about that :)

Monday, October 08, 2012

Kim Fields: Take Flight Class, at Bifrost Copenhagen

So finally, here are my bird beads from the Kim Fields class, in order of completion.

Day 1:

First bird, 3 layers of wings on such a small body is not easy. The head is tilted to the left. I didn't mean to, but I like it :)


Second bird, an owl, came out kind of okay. With a white coating on the belly, wings on the back, a tiny bit of a tail and many many tiny little claws. The eyes were difficult, in that the indentations in the white were easily lost since white glass is so soft. The beak is more of a nose, but the placement is good. The horns ... meh.


Bird no.3. A little extra one I fit in, in the afternoon. Nothing special.


Day 2:

Bird no.4 the Pudgie. Markings around the beak and eyes. Took a lot of fiddeling and didn't come out too well. Also made me forget to heat the tail, so it popped off later in the kiln. Oh well ...


Bird no.5 An actual bird, the Vermillion Flycatcher. Mine is a bit chubby, but I like it all the same. The black line on his face was supposed to go through the eye and through the beak, but as red turns black when hot, it was not easy to see where the colours met. Trying to tell the to colours apart, I got it too hot and the line flowed downwards. An ekstra dot of red on the top of the head pushed the line too.


This final bird we made is the Musvit. I am very pleased with how it came out. See how the head is round with an angle at the back and a full melt-in at the front? It has a good size too, compared to the body. See the half-circle marking on the cheek, and the eyes properly indented? And it has a line of black running down the chest and some white under the tail.


The wings need work in the shape and thickness, but they have a lighter line across on the upper part, and a coating of striated stringer (which I made myself, Woot!) on the 2 lower wing layers. It is on the topside of the tail too.

After only 5 sparrow shaped birds ever, I'd like to declare it a success. Yay! :)

This last bird is not made by me. It is made by Kim Fields herself, and now resides in my glass collection. Isn't it fabulous? :)


All in all I have to say it was a wonderful experience. Being in a room full of hyper-focused people is a special feeling, and I am very pleased I got to be a part of this class.
Thank you to all involved.

Wednesday, September 26, 2012

Kim Fields: Take Flight Class, at Bifrost Copenhagen

Oh my! Did I ever have the best two days with Kim Fields and the other students over at Bifrost Studio Glas. Oh yes :)

I almost didn't make it, being very ill om monday. I was in bed all day and couldn't eat a thing. I thought there were no way I could be at the class I had looked forward to for months.
Tuesday morning I felt somewhat better, though still doubting I could last the full day, but off I went with determination. And lo and behold, the excitement of the class and the good food we got (+ a little bit of coca cola) kept me on my feet all day. Yay!

The only birds I have made before this course has been tiny one-colour spacers with a dot-head, tail and little squished dots for wings. They are all cute and fine for earrings, and where actually the first thing I made back in 2007 when I got my torch and tools.

Now however, I feel I can move on to bigger and better, and since I love to sculpt my lampwork, this class seemed like just the thing for me. And it was! I had a blast :)


Kim Fields making a fabulous and complex Toucan
And I learned so much from Kim!
Sculpting colourful birds is nothing like sculpting goddesses. You have to be very precise with the heating or you'll loose definition on the previous steps. I learned about precision heating, laying down lines and not have them move while melting in, softening the base, but not loose the shape of little dots on top, pulling tiny dots into shapes with the tip of a stringer ... I even made my very first cane. Hooray!
It was simply a fabulous class, and I am so happy I got to go after all. 


This is the Toucan, finished but for the final turn of the head
We, the students, did not make a Toucan, the beak alone took half an hour to make, but it was interesting to watch the process, in case we should feel adventurous later at home :)

We did get to make this one below. I don't know the name in english, but Kim had spottet it out her window in the morning, and it is one of the sweetest local birds I know of. It was the last one we all made, complete with face- and chestmarkings, and 3 layers of double layered wings, using the striated cane we made ourselves.
I was very pleased with my version of this one as it went into the kiln, and I hope I will be when it comes out too. I look forward to getting my birds from day 2 in the mail, so I can post them all together.

The danish name for this bird is Musvit
Many, many thanks to Kim for coming all this way to teach us, and to Jette for arranging it and for taking so good care of us while we got lost in colours and shapes and flames.
Thank you!!!

Thursday, September 20, 2012

Fish- and Mandalabeads

It seems that over the summer I have developed a fondness for large beads. Usually I don't wear large or colourful jewelry, but lately I have been. Still within my prefered somewhat muted colour palette, but for me these are very flashy. 

First I made fish beads like this one:


I even finished up 2 as necklaces, for Karin Castens sea/mermaid themed exhibition in august. This is not my biggest fish, but it will fill the center of your palm up nicely. This one and his purple/mintygreen friend can still be found at Castens on Holbergsgade 19a.

Then I happened to come across Kristina Logans video clip of her making her wonderful disc-shaped beads, and I had to try that too.
Mandala beads, a lovely shape to fondle. Mine with large holes and lots of texture.


Do not drop on tiled floor!
This one, unfortunately, is no more :(
 
I have ordered silk ribbons for these circular goodies, and they will be necklaces too shortly. While I wait I will see what fun variations I can come up with. Ideas are swirling :)

Lene

Tuesday, June 19, 2012

More New Marbles

I'm rather fond of this one. It looks like a single coral sending out its egg into the ocean. It's a circle of SIS with inward spikes, on a purple frit background. I'm thinking it should be possible to make a group of spawning corals, though they might well lose their circular shape during implosion.


Two more in pink, a flower and a spiral, both implosions too. They are both quite low in the marble, the spiral most, which makes it hard to see properly, even in person.


I'm afraid I still need to work on my roundness. Apparently I don't pay enough attention to the roundness, while I do remove chillmarks carefully. I probably should punty several more times than I do, in fact, I probably should make myself a very simple marble and punty it over and over just to practice.

I still worry about dropping the marble, and I definately do not master any kind of cold connection yet. I make my hot connections real skinny, so there is only a little bit to melt flush in the end, but of course this makes it very easy to get the punty too hot and droopy while working on the marble.

Well, there is always Practise, Practise, Practise :)

Tuesday, June 12, 2012

Back from a Beadiful weekend (part II)

Sunday, the second day of the event, is open for the public. From 10am to 5pm there are demos to watch, you can try making your own bead, there is a beadcontest to vote for, both Ravstedhus and Ombos are open for business, and finally, there is the bead fair, full of awesomeness to bring home.

Here is my booth


and here is Martina Schlemminger's, which was next to mine. I could use some more colour, don't you think?


Here is a picture of some lampworkers looking at the contest beads. The theme was 'Eventyr', the danish word for fairytale. It also means adventure, so there is room for interpretation :)


And here are the winning beads!
First place goes to Connie Sørensen for the Sleeping Beauty Castle
Second place goes to my three Tinderbox Dogs (woohoo!!)
and the shared Third place goes to Bente Clausen's Goddess and Matina Schlemminger's Dragonhead.
Hooray, Congratulations all around! :)


You can see all the (13) participating beads at Brittas Blog Pibbs. She has made an extensive account of the weekend, 4 posts long: post 1, post 2, post 3 and post 4. Go have a look, there's a ton of pictures :)

Spending a whole day looking at beads can make you fall in love. This year I brought home this fun and colourful mushroom from Martina and the fabulous glass pen below. And I didn't need a full day, it was love at first sight :)


Glorious, aren't they? And now I just need some ink. Martina had brought some, but it never crossed my mind that I would need that too. I just loved the glass as it was. Yum!

Then I went shopping for materials. I got some glass, light ivory, sea colours and pinks, and also some tubing so I can try the blowing technique we saw saturday night.


And some leather cord necklaces, some copper wire for leaves probably, and 3 magnetic locks with inlays, so I can make either bracelets or necklaces on wire. Can you believe I have never made a beaded bracelet?


I also got 3 large neckdisplays and a hollow mandrel with a blowhole for hollow beads.
Yup, definately a great weekend :)

Lene

Wednesday, June 06, 2012

Back from a Beadiful weekend (part I)

Hooray! What a wonderful weekend :)

It is such a treat to be able to visit the one and only annual lampwork event of the country. This was the third year I got to visit the lovely south of Jutland and spend a full two days on nothing but lampwork.

Beautiful clouds over the flat land of southern Jutland
The first day, saturday, is for members of 'Foreningen Danske Glasperler' only.

We started out with Thomas Risom, who told us about glass beads from the times of the vikings and the first glass bead maker in Denmark, located in Ribe. He was very entertaining, and I enjoyed hearing him speak even if ancient beads doesn't interest me much.

Later he showed us the bead volcano he had made himself from clay, sand and horse droppings. It does not go as hot as our torches, but it goes up to about 900 C which is enough to round out the beads. You can see more pictures of his process at his vikingblog.


Thomas and Jesper working the bead volcano


Then Jytte Petersen showed us how she makes the decorative pins, known in Denmark as 'nipsenåle'. I was looking forward to this because I have made a few of them myself.
Jytte makes them in the old fashioned style. They are quite adorable, tiny little creatures, all with a very happy body language.


Jytte Petersen making a bird pin


Grooming bird, seahorse, horse, elephant and a happy, happy pig :)
The seahorse and the elephant went home with me,
along with another seahorse and a simple bird

Later Martina Schlemminger showed us her mixed colour beads. The green/yellow combination is very popular in Germany this year.


Martina Schlemminger spinning a bead


Martinas Bead Candy, Yum!
 and Christiane Strauss of Ombos showed the chrysantemum bead.


Christiane Strauss making a chrysantemum bead
In the afternoon Tom Lundsten showed us the process of making a beadstamp. He is working on making a product for Ravstedhus, where you can mail off a drawing and get it made into a brass stamp. Exciting!

After dinner at the local Inn, we went back to hear from Tina Moeslund. She showed her set-up for engraving beads and also a super easy way to center a 1 wire bracelet into a 5mm magnetic clasp. It involves a centering bit which also makes it very easy to get a very secure and tight closure.

Finally to end a wonderful day, Jens Christian Kondrup blew hollow beads from blobs of molten soft glass, and it didn't even crack from cooling off in open air. I got myself a couple of tubes so I can try this at home :)

Phew. You can certainly learn and experience a lot in just one day!
I only got a little bit lost on the way back to my B&B :)

More pics in my next post, including the contest beads ...

Friday, June 01, 2012

No shopping notice!

I'm back, and the shop is open again :)

The shop over here
<------------------
is closed till monday, when I return from the lampworkers get together.

I'll be off in just a few hours, Yay!!


Have a great weekend <3

Wednesday, May 30, 2012

Only a few more days, before ...

... the one and only annual danish lampworkers get together, arranged by 'Foreningen Danske Glasperler' (the Danish Glass Beadmakers Society).

On friday I'll be off to the most southern part of Jutland, where Ravstedhus graciously lend their land and facilities to the society for two days. Two days of demos, bead talk, tool and supply shopping and on sunday, the lampworkers market, and more demos open to the public. It will be great!

This year I made sure I took the time to make and send in a bead for the competition. The theme was 'Eventyr' (fairytales), or I could be completely wrong because that word can also mean 'Adventure'. Oops?!

In any case - I made a trippel dog bead, to illustrate the 3 dogs from 'the Tinder Box' by H. C. Andersen. What a weird ending that tale has. The soldier simply terrorizes everybody into saying: 'Why yes, of course, you must be our new king!' I realise that old time fairytales are not made for children, but still, is that the kind of morals we/they would want to pass on as great? I am a little confused.

So - I have never made a dog in glass before, and 3 in one does not make it easier I can tell you. I did need a couple of tries before I were happy. The first ones didn't even look like dogs, but rather teddy bears. Then I realised how to fix their faces and a more proper way to place the legs. They are still cartoony though, but after all it is a fairytale, so that is just fine.
I sent in the one on the left, in wich I included a heap of 'money' for the dogs to sit on.

view of the 3 little dogs 'cause they are cute

another side view

See how the ones on the right are all teddy-ish? Even with the tounge sticking out. They are all ivory and I fumed them a bit, for a more delicious tone of brown. There are always things you'd like to do different, but time is up and I am pleased with my progress, and with the bead I sent in.

I am looking forward to seeing the other peoples fairytale beads, to getting to do a roadtrip, meet all the lampworkers and to all of the weekends adventures. Yay! :)

I hope you have a great weekend too :)
Lene

Monday, May 14, 2012

More marbles (purplish)

I made some more marbles! :) 

This is a big one, more than 1" across. My vortexs seem to grow uncontrolably while I build them. This one, like my first vortex, is without a solid backside colour. I rather like it that way. It is also slightly transparent, since I didn't cover it completely in purple frit. I like that too.

It doesn't really show, except when you hold it, but the center of this one apears so deep it wouldn't fit inside the marble. It is very cool.
And check out that bubble I planted in the depth of the vortex. I thought it would go round as I finished the backside, but no, it has kept a neat pointy spaceship form. Vrooooom!

I am keeping this one, in my pocket for now, because even though the lens magnifies like crazy, it is still not smooth enough to live with somebody else.


Front

Next time I'll see if I can get some light in there.

Back

This next one has a name. Oh I know, you don' believe me, since I never ever name anything. Even my teddy bear I had as a child went without a name for some 13 years. But this marble has a name and got it as soon as I picked it out of my kiln. It's a Fairy Flower. Yeps. Because it's kind of like a flower, but not really. 

Two experiments went into that. The white center dots that melted into each other and didn't spike much, and the skinny purple things flabbing in the breeze. Those were made by pushing line-shapes into the back of the frit and imploding them. I expected to see raised lines, but no, I got skinny pointy bits.

I covered the back in white, because the purple frit keeps staying on the surface and devitrifying and looking really bad. Next time I'll dip once more in the frit before I cover it for a purple background. It will be lovely.


I also made another marble, but it photographs incredibly bad, so no picture of that. I am only mentioning it (without a picture) because a strange and interesting thing happened when I imploded.

I made a stringer from dipping clear in goldstone fine frit. It has a lovely minty blue colour, but since it is on clear it is very transparent and doesn't show up well in pictures.

In the marble I made 2 circles of bubbles and a single one in the center, then dottet them with the stringer. Then, to avoid too much boiling of the goldstone, I covered the dots in clear. I had expected the stringer dots to rise up, like petals and dots usually do, but they all stayed mostly flat. Then the outer dots curved downwards on the outer rim away from the center, following the side of the marble towards the back.

None of the colours I have imploded so far has done anything like that. I am sure it is because it was mostly clear and with hardly any difference in viscosity. Fascinating. I'll have to see if I can duplicate it some time.

-----

This is obviously not a marble. It is a picture from my garden, where the appletrees are blooming like crazy! The cherry trees have already lost their petals, but they were lovely while it lasted. Just to let you know that spring is here, and it is fantastic!


Love,
Lene

Monday, May 07, 2012

Giant Spiderrs! (Don't worry, they are all glass)

At the Museeum of Natural History in Copenhagen, right now there is an exhibition about spiders. This might well have been one of those events where I think 'Oh, I'd like to see that' and then promptly forget about it. But when I heard some of the exhibits were made in glass - well, I just had to go and see it for myself.

The 5 glass spiders on exhibit are made by British glass artist Neil Wilkin. There was a short video of him,  making them in parts and putting them together on a center bit of steel. They are quite fabulous, and large!

Here is the Green Lynx Spider,


Here is the Black Widow,


a White Crab Spider,


a jumping Spider,


and finally a Tiny Orb Weaver.


Fabulous!
But you really have to see them up close to apreciate the finer details. My favourite is the jumping spider, covered in frit and lovely soft colours.

There were of course live specimens present too, large and small. Most of them were kept in semi-darkness, but this palm-sized fishing spider had just enough light for a decent picture (I didn't want to use flash on the poor creatures). See that gubby in the water getting a little too close for his own good?


They also had a few examples of clothing made from spiderweb.
This hat-thingy was made by collecting webs with a V-shaped branch (or two braches put together). When the webs have formed a solid 'fabric' you are done and slide the hat off the branches. It is supposedly water tight, but ... it was also full of insect remnants, so a big 'no thank you' from me.


This scarf however, is beautiful. It was made by pulling the silk directly from the spiders, then spinning it to weaveable threads, and finally weaving the scarf. The amazing golden colour is completely natural, from the spidersilk itself. That I wouldn't mind wearing.


I am wondering what they will do with the glass spiders after the exhibition closes in december. I wouldn't mind giving that jumping spider a new home :)

Love and creepy crawleys,
Lene
Related Posts Plugin for WordPress, Blogger...