Thursday, September 04, 2014

Høstmarked at Musicon i Roskilde!

Så er det tid til årets Høstmarked!


Denne weekend d.6-7 september deltager jeg med mine glassmykker  og nipsenåle (sammen med 44 andre spændende stande) i Høstmarkedet i Musicon ved Roskilde.

"Fortidens trend - nutidens inspiration.
Besøg årets Høstmarked.


Trendy torvehal med nye og unikke smagsoplevelser. Hyggelig markedsplads med fokus på særlige og unikke produkter.
Boderne byder på alt fra sommerens arsenal af spiselige produkter. Delikatesser, specialiteter, gastronomi og andre gode sager.

Redskaber til haven,  havemøbler, planter, kunst, kunsthåndværk og Kreative produkter. Inspiration til både indendørs- og udendørs hygge.

Mød de spændende arbejdende værksteder, med workshop for børn og voksne."


Musicon findes på adressen:
Musicon
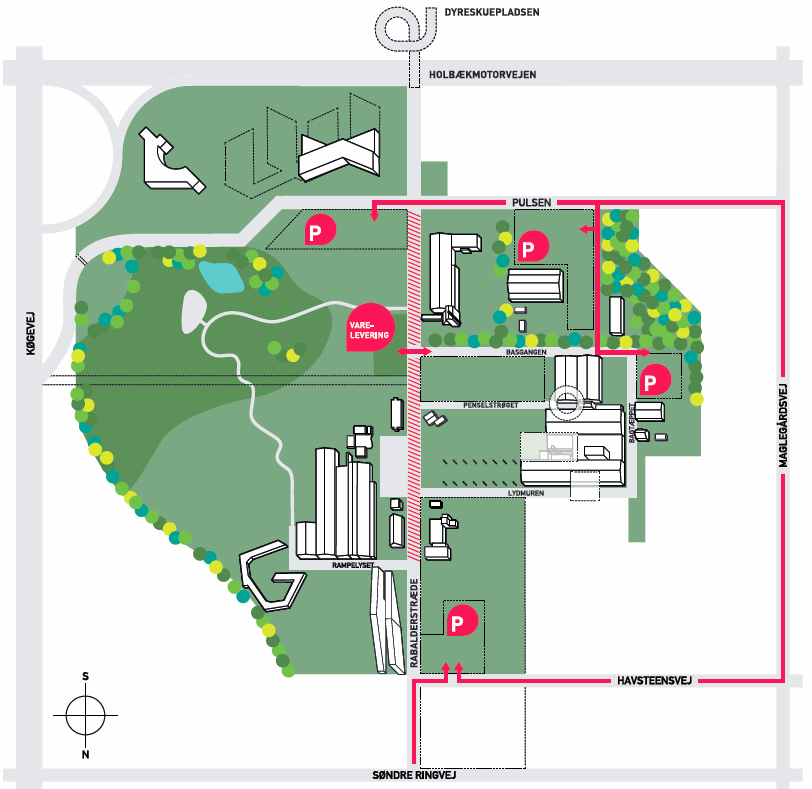
Rabalderstræde 1
4000 Roskilde
 
og markedet finder sted i Hal 10.
 
Der er åbent lørdag d.6 kl.11-17 og søndag d.7 kl.10-16.
 
Der tages en entré på 35,- men du kan printe din egen rabat billet og komme ind for 25,- 
 
På grund af ombygning på området er der omkørsel. Find vejen her:


Tuesday, August 26, 2014

Happy 5 Years Anniversary!

Today is the actual date of my 5 year anniversary. Hooray! *throws confetti*

The Open Studio weekend went very well. A big THANK YOU! to all of the visitors who were trickling in and out the whole time. I am so happy I got to show the wonderful craft of lampwork to all of you.


Thank you to old friends and new friends for stopping by, and thank you to all 'strangers' who came to see what it was all about. Thank you for the fun challenges you gave me.


And finally a big thank you to my dear family (mother, father, sister and my husband) who helped with lots of things, before and during the weekend, to get everything ready.

THANK YOU! :)
 
More pictures from the weekend can be seen here, and here is the photo countdown from earlier.


Saturday, August 23, 2014

Happy Birthday, Little Mermaid :)

Everybody celebrates the 100'th year, so here's to the Little Mermaid - 101 years! Woot!

Today is the 101'st birthday of the little Mermaid.
Not the fairytale by H.C. Andersen, which is much older, but the statue in the Copenhagen harbour.
There she sits, the lovely little thing, gazing across the water ...

To celebrate this day I decided to see how many mermaid lampwork beads I could find, because I definately knew they were out there. And I were not dissapointed. These are just a fraction of what can be found. Enjoy!


Rachelle Goldreich is the maker of this sparkly wet mermaid.


This beauty was made by Marlene McDonald of Marlene McDonald Glass, maker of sea treasures.


Ulrike Dietrich made this sweet and colorful focal.


This cute number is by Diana Rast of DizzyBead. She has several mermaids and many other little pendant friends in her shop.


This stunning focal is by Melissa Johanneson Rice of Flame Touched Glass. Melissa has many owls and colourful mushrooms in her shop. (the mermaids tail is on the back of the bead).


This sleek form is by Sally Sutherland of Soul Silver. Clean beadlines and sweet silver pieces are in her shop.


This playful Mermaid was made by Rebecca Jurgens of LandsArts.


Three Mermaids in a row, by Summer Cambell of Summer Glass Designs. Click the picture for a better view.


This necklace is by Simin Koernig of Simins Creations.


And finally, a sparkly Mermaids tail from Ginger and Jerry at BeadTrap.


Thank you so much to all the artists, for use of your pictures, and for making the beads in the first place. What a bounty of beautiful flowing shapes and colours :)

I also wanted to make my own mermaid, and if you come visiting my 'Open Studio' today or tomorrow (at 10am - 5 pm) you will get at chance to see and perhaps bring home one of the very first of my brand new Mermaid Pins! Tiny and shiny :)


Have a great weekend!

Thursday, August 14, 2014

Profusion Art Glass celebrates 5 years anniversary!

Five years ago this month, I finally worked up my courage and registered my lampwork hobby as a proper business. And now as time has passed, it is time to celebrate!

Fireworks! Pew pew ...

So on saturday 23'rd and sunday 24'th
I open the doors to my lampwork studio,
and you are invited.

I will show you how glass beads are made; goddess beads, other shapes, dotted beads, pins too (nipsenåle) ...

I will serve you a light snack and give you 20% off all beads and jewelry ...

I will even take the challenge of making your dream bead right then and there. You know, the one you have not been able to find anywhere ...

Sounds good?
Then drop by on aug. 23-24 from 10-17 and lets talk.

Until then you can find the info and the address on my facebook event, join/like my facebook page and follow my 10 day photo countdown as it unfolds.

Monday, July 28, 2014

Mixed media, hmm?

Hmm, so apparently flint stones are quite sensitive to heat. At least glass melting heat.

Many years ago I saw this beautiful idea on the web, of a natural stone with a pit/hollow in it, in which was placed a nice colourful implosion. You can see the picture I had seen here, at DeMoss Glass Art. I love it, I do, and I want to try to do that too.

I'd obviously like the implosion annealed, so the choises are to anneal it while in place, with the rock inside the kiln (though I don't know if they would shrink equally or just crack the glass), or to shape the back of the implosion after the rock, anneal it and glue it in later.

Around the corner of my house is an empty lot covered with pocket size stones, so off I went to find a handfull of suitable ones. I did find some, nicely shaped and able to lay flat in the right direction, all of them flint.

I didn't want to just drop them into my kiln and fire it up, as they might explode, as they would in a fire pit. I don't want to endanger my heating elements, so instead I tried to push the backside of a hot implosion into the hollow of a stone at room temperature. It seemed like a good idea, but then within 3 seconds - smack! the flint decided to split, right in the middle. Darned! My best stone too of course, because why test it first :)

Split Flintstone
I do have a few thoughts -

The next step would probably be to try heating the stone after all. But I have no fiber blanket to cover it (if it should decide to fling shards around the inside of my kiln), and how would I get the stone out of the kiln hot, and handle it firmly, while also handling the soft glass implosion? Well, a grill tong perhaps, but it might well slip. Some sort of face shield would be good too, if it decides to jump at my face, while I finish off the glass surface, at an extra 500C above kiln temperature.

Maybe I need a larger stone to better withstand the heat when I press the implosion into it. Or maybe flint just isn't the best material for this project, though it is fairly readily available to me and naturally pitted. I wonder what stone the DeMosses use ...

So there you have it. I shall lay this idea to rest (again) for now, as I am going to be a busy busy bee for the next couple of weeks (explanation coming up in a few days).

Sunday, July 20, 2014

Testing Tumbled Beads

After the first success of tumbling the seaglass pendants, of course I turned to my ladies next.

I tumbled only a few, to test before possibly ruining a whole bunch at once :) and here is the result:


On these I am not quite as enthused about the clear lines. It doesn't show much on the ivory ladies, but is very prominent on the black one. I checked in on them at 10 hours, but this is the result of 24 hours of tumbling. If I tumble them anymore there will be no nipples left, and still the clear does not seem to go away.

Which was of course the entire point I was raving about earlier, and so -

Here are my new babies!

Beads with deliberate patterns as impressed lines, then tumbled for just 4 hours. They are sooo delicious! All frosted and smooth, still translucent, and with clear paths trailing all around. They are fairly large for what I normally make, but on a short cord you don't even notice the weight.


I have a second batch in the tumbler as I write this, in other patterns and other colours, and they are huge! Also, I build them up with clear cores and just two layers of a transparent colour on the outside, so they would be a bit lighter in colour than these, which are colour all the way through. It is summer after all :)

I can't wait to see how they turn out ... :)

ETA: The before and after ...

Shiny beads

Frosted! I like it :)

Yay! :)

Monday, July 07, 2014

How to turn a large desk into a workshop table

Earlier this year I were lucky and got a desk for free through Freecycle Copenhagen. The table I had was very shaky, which is both annoying and not very usefull, and I thought this model would be much more stable with the large 'feet'.


The desk was quite enormous, so I thought I'd remodel it to better fit my needs, which was a stable jewellers bench. As you see it already has a curve, and it was even in the right side for where I wanted to place it.

So - first we cut off the excess depth


and the excess width.


The legs were secured to a metal frame under the plate. Since so much was cut off there were no room for all 3 legs and the large frame around them, so two would have to do.

The table included an extra pull-out plate, so we split the frame, cut away about 20cm, and inserted the smaller pull-out profiles to make it a whole again.


then assembled the frame ...


And put the plate on.
To keep things from rolling off the edges we cut the surplus plate and had enough for a barrier all the way round.


and Tadaa, there it is. Such a major improvement. All I need now is a bit of silicone to seal the cracks, and I'm ready to move in :)
Hurray, metal work , here I come!


Related Posts Plugin for WordPress, Blogger...