Monday, December 03, 2012

Tolkien Event at Galleri Castens!

The premiere of the new Hobbit movie is just around the corner, and jeweler extraordinaire Karin Castens of Galleri Castens in Copenhagen is making an event of it.

She has made a series of jewelry with an elven theme. It fits her style perfectly, and this saturday, on dec. 8'th at 2pm you are invited to come to her beautiful shop and enjoy a free Tolkien themed harp concert and the unveiling of her new pieces.

She has only revealed one of her designs, a gorgeous pair of earrings. They are so very pretty and I want them! I'll pet them and squeeze them and name them 'my precious'.
You can see them here, on her facebook page, where you might also be very lucky and win a pair! Yes, Galleri Castens has been touched by the spirit of Christmas and is giving away treasures right and left (or at least a fabulous piece every sunday until Christmas). Go and like her page NOW to have a chance at winning.
 
Karin also asked all of us, who have pieces in her gallery, if we would like to participate in creating Tolkien inspired jewelry for the event. Why yes, yes I would :)

My first idea got dumped pretty quickly, and my second thought was to make orc teeth and maybe some bones. But when I showed my children the tooth I had made, and asked them what it was (is it a pelican? is it a tadpole? well, at least one child suggested it was a claw) it was pretty obvious I'd need more time to practice to be able to pull that off.

In the end I was very pleased to send in this leaf and flower necklace on handpainted silk ribbon.


Making this have me tempted to do an all flowers necklace, with different colours and sizes all around the neck. That would be lovely for spring :)

Now I am looking very much forward to saturday, where I will go and have a listen and a look at all the beauties that has been made. Want to join me? :)

Monday, November 05, 2012

Happy/Sad Facebeads, a blast from the past

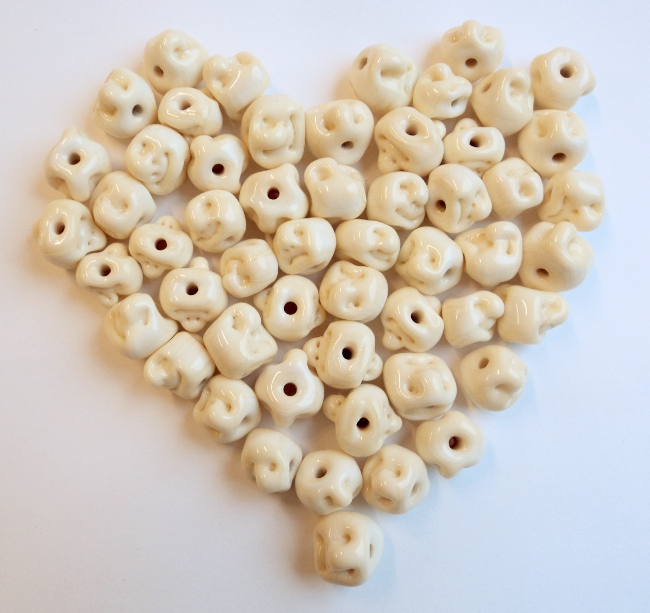
Recently I got a surprise order of a whole bunch of happy-sad facebeads. This is a bead I made back in 2008 when I were just starting out, and it was really nice to make them again.

These are just like the ones from back then, but now I have several new ideas flapping around in my mind because of this visit to the past. Yay, this will be fun!

I rarely have this many beads at once, so I snapped a few pictures before sending them off to their new home tomorrow.

Cute, eh? :)


Monday, October 29, 2012

Universe / Planet Marbles


One of the very first things I bought when I started lampworking almost 6 years ago, was fine silver leaf. 25 little sheets of it, and guess what I still have laying around.

Well, this week I made good use of some of them and made these universe marbles.

Click for a larger version.
These marbles are so lovely in the sun.

The three smaller ones are thinly encased, and I'd like to try one with a thicker layer of clear next time. It is fun to see the center 'landscape' bend under the clear, and a thicker layer would magnify even more. I might be able to make mountains or craters or perhaps even clouds. Some sort of structure in any case.

The two bigger ones have a spiralling indentation under the surface. They are not too tight, but I think people call them tornado beads, when using this technique for beads.

Those two marbles are my biggest ones yet, but I gave the very biggest to a new friend, and forgot to measure it first, so I can't say exactly how big it was. I any case, the spiralling technique adds quite a bit of clear and makes the marble grow considerably from its base size.

As for the roundness - I'm getting closer every time :)

Monday, October 15, 2012

What is a MARIMO?

No, not a fancy new lampworking tool, or a fabulous new colour of glass - a Marimo is a bunch of algae, living and growing as a free flowing ball, rolling along on the bottom of Lake Akan in Japan. They have no roots and sometimes they will lay on the bottom, sometimes they will rise up to the surface, presumably to get more light.

See videos on YouTube about marimos

They are good for clearing the water in your aquarium, where they will use up all the nutrients before other types of algae gets a chance to grow. If you do not have an aquarium that needs tending, you can keep the Marimo as a pet (or more likely, as a houseplant, though submerged in water).

A few weeks ago I first encountered these intriguing lifeforms, and I'm afraid I fell in love right away. It is probably just a fad, but ... my Marimos are here! Woot!! :)

I ordered a bunch of them. I have some for my aquarium, some for my desk at work, some for the windowsills, some for my children to love, and even some for my mother. Yes, the madness is spreading :)

And hey, being a lampworker, what else could I do? I made Marimo beads!


Just a couple so far, testing out colours. I used my new cane-making abillity to pull stringers with an opaque center and a transparent coating. It is very suiting for these beads, emulating algae strings overlapping the ball surface.

The first cane was made with a peagreen center, and ended up in this bead.


Then I accidentally grabbed a rod of Kiwi, same peagreen surface, but with a transparent center. When pulled to a stringer and applied it has a more ghostly see-through appearence. I like that too on these darker versions.


I tried a few different colours for base colour, which all seemed possible from what I have seen on YouTube, and now that I have the real deal to look at I will see what I can do to make them a bit more velvety. I'm happy about the texture though.

The Marimo balls also exists in other places, like Iceland and Estonia, and even in Denmark we have a similar ball of algae. In Danish it is called 'gedebolle' (goat-ball), named after the green ball a ruminant will retch up for a second or third munching.
Not quite as charming as Marimo or Mooskugeln as they are called in Germany. So mine will be Marimos, unless of course they each get a pet name ... We'll see about that :)

Monday, October 08, 2012

Kim Fields: Take Flight Class, at Bifrost Copenhagen

So finally, here are my bird beads from the Kim Fields class, in order of completion.

Day 1:

First bird, 3 layers of wings on such a small body is not easy. The head is tilted to the left. I didn't mean to, but I like it :)


Second bird, an owl, came out kind of okay. With a white coating on the belly, wings on the back, a tiny bit of a tail and many many tiny little claws. The eyes were difficult, in that the indentations in the white were easily lost since white glass is so soft. The beak is more of a nose, but the placement is good. The horns ... meh.


Bird no.3. A little extra one I fit in, in the afternoon. Nothing special.


Day 2:

Bird no.4 the Pudgie. Markings around the beak and eyes. Took a lot of fiddeling and didn't come out too well. Also made me forget to heat the tail, so it popped off later in the kiln. Oh well ...


Bird no.5 An actual bird, the Vermillion Flycatcher. Mine is a bit chubby, but I like it all the same. The black line on his face was supposed to go through the eye and through the beak, but as red turns black when hot, it was not easy to see where the colours met. Trying to tell the to colours apart, I got it too hot and the line flowed downwards. An ekstra dot of red on the top of the head pushed the line too.


This final bird we made is the Musvit. I am very pleased with how it came out. See how the head is round with an angle at the back and a full melt-in at the front? It has a good size too, compared to the body. See the half-circle marking on the cheek, and the eyes properly indented? And it has a line of black running down the chest and some white under the tail.


The wings need work in the shape and thickness, but they have a lighter line across on the upper part, and a coating of striated stringer (which I made myself, Woot!) on the 2 lower wing layers. It is on the topside of the tail too.

After only 5 sparrow shaped birds ever, I'd like to declare it a success. Yay! :)

This last bird is not made by me. It is made by Kim Fields herself, and now resides in my glass collection. Isn't it fabulous? :)


All in all I have to say it was a wonderful experience. Being in a room full of hyper-focused people is a special feeling, and I am very pleased I got to be a part of this class.
Thank you to all involved.

Wednesday, September 26, 2012

Kim Fields: Take Flight Class, at Bifrost Copenhagen

Oh my! Did I ever have the best two days with Kim Fields and the other students over at Bifrost Studio Glas. Oh yes :)

I almost didn't make it, being very ill om monday. I was in bed all day and couldn't eat a thing. I thought there were no way I could be at the class I had looked forward to for months.
Tuesday morning I felt somewhat better, though still doubting I could last the full day, but off I went with determination. And lo and behold, the excitement of the class and the good food we got (+ a little bit of coca cola) kept me on my feet all day. Yay!

The only birds I have made before this course has been tiny one-colour spacers with a dot-head, tail and little squished dots for wings. They are all cute and fine for earrings, and where actually the first thing I made back in 2007 when I got my torch and tools.

Now however, I feel I can move on to bigger and better, and since I love to sculpt my lampwork, this class seemed like just the thing for me. And it was! I had a blast :)


Kim Fields making a fabulous and complex Toucan
And I learned so much from Kim!
Sculpting colourful birds is nothing like sculpting goddesses. You have to be very precise with the heating or you'll loose definition on the previous steps. I learned about precision heating, laying down lines and not have them move while melting in, softening the base, but not loose the shape of little dots on top, pulling tiny dots into shapes with the tip of a stringer ... I even made my very first cane. Hooray!
It was simply a fabulous class, and I am so happy I got to go after all. 


This is the Toucan, finished but for the final turn of the head
We, the students, did not make a Toucan, the beak alone took half an hour to make, but it was interesting to watch the process, in case we should feel adventurous later at home :)

We did get to make this one below. I don't know the name in english, but Kim had spottet it out her window in the morning, and it is one of the sweetest local birds I know of. It was the last one we all made, complete with face- and chestmarkings, and 3 layers of double layered wings, using the striated cane we made ourselves.
I was very pleased with my version of this one as it went into the kiln, and I hope I will be when it comes out too. I look forward to getting my birds from day 2 in the mail, so I can post them all together.

The danish name for this bird is Musvit
Many, many thanks to Kim for coming all this way to teach us, and to Jette for arranging it and for taking so good care of us while we got lost in colours and shapes and flames.
Thank you!!!

Thursday, September 20, 2012

Fish- and Mandalabeads

It seems that over the summer I have developed a fondness for large beads. Usually I don't wear large or colourful jewelry, but lately I have been. Still within my prefered somewhat muted colour palette, but for me these are very flashy. 

First I made fish beads like this one:


I even finished up 2 as necklaces, for Karin Castens sea/mermaid themed exhibition in august. This is not my biggest fish, but it will fill the center of your palm up nicely. This one and his purple/mintygreen friend can still be found at Castens on Holbergsgade 19a.

Then I happened to come across Kristina Logans video clip of her making her wonderful disc-shaped beads, and I had to try that too.
Mandala beads, a lovely shape to fondle. Mine with large holes and lots of texture.


Do not drop on tiled floor!
This one, unfortunately, is no more :(
 
I have ordered silk ribbons for these circular goodies, and they will be necklaces too shortly. While I wait I will see what fun variations I can come up with. Ideas are swirling :)

Lene
Related Posts Plugin for WordPress, Blogger...